
Did you notice that you put your clothes in your dryer, ran it as usual, but when you took everything out, it was all still wet and dripping?
That is what happens when your dryer develops a fault that stops it from getting hot.
Most heat failures come down to a handful of fixable causes, and several of them are straightforward DIY repairs. This guide walks through all of them: what causes the problem, how to diagnose it, how to fix it, and how to keep it from happening again.
Gas vs. Electric Dryers: How They Differ
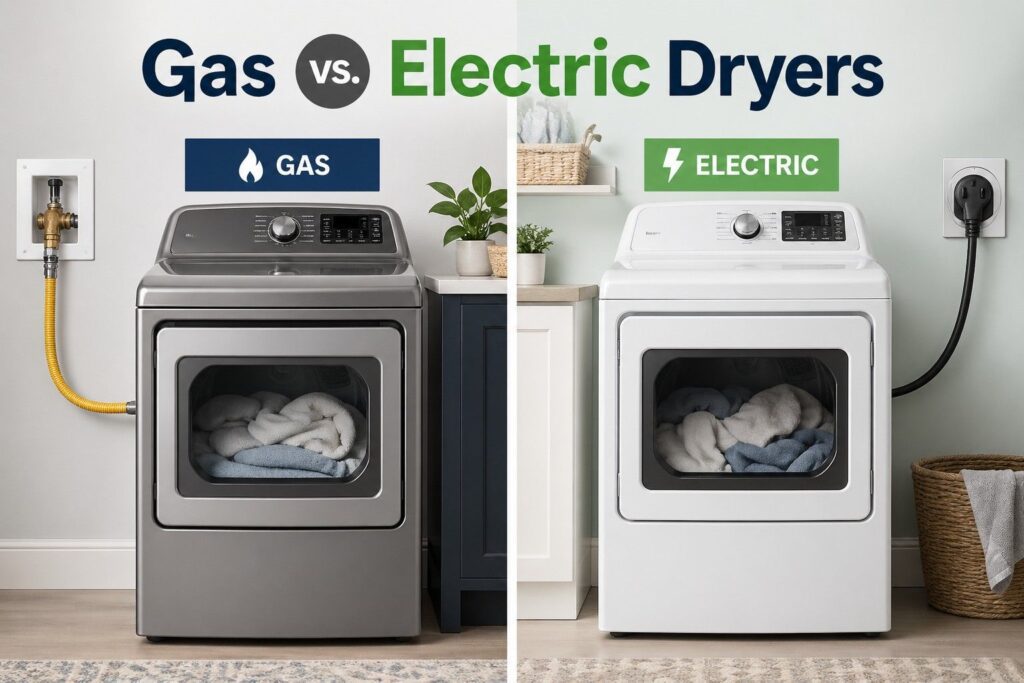
The first thing that should be cleared up before anything else is the difference between heating failures in gas and electric dryers. Diagnosing the wrong type wastes time.
Electric dryers use a metal heating element, essentially a coiled wire that heats up when current passes through it, similar to a toaster. They run on a 240-volt circuit, which means they actually use two circuit breakers. This is a detail that trips people up constantly: one breaker controls the motor (drum spinning), and the other controls the heat. You can have a tripped heat breaker while the drum keeps running perfectly, which is exactly why the machine seems to work but produces no warmth.
The most common electric dryer failures are a blown thermal fuse, a burned-out heating element, and that tripped breaker situation.
Gas dryers use a burner assembly to heat air, similar in concept to a gas furnace. They run on a standard 120-volt outlet for the motor and controls but need a gas supply line for heat. When a gas dryer stops heating, the issue is almost always in the ignition system, specifically the igniter or the gas valve coils (also called solenoids) that control gas flow to the burner.
If you’re ever unsure which type you have, look at the back. A gas dryer has a gas line connection. An electric dryer has a large 240V outlet and a thick power cord with three or four prongs.
One thing both types share: a thermal fuse. This is a one-time safety device designed to blow if the dryer overheats, cutting power to the heating circuit permanently until it’s replaced. It’s the single most common cause of a no-heat dryer across both gas and electric models.
Possible Causes for a Dryer Not Getting Hot
Now, let’s break down the various causes for a dryer not getting hot, according to where the causes apply and how common they are. We’ll also mention whether they are DIY fixable or not.
| Cause | Applies To | How Common | DIY Fixable? |
| Tripped circuit breaker | Electric only | Very common | Yes |
| Clogged lint trap or exhaust vent | Both | Very common | Yes |
| Blown thermal fuse | Both | Very common | Yes |
| Failed heating element | Electric only | Common | Yes |
| Bad igniter or gas valve coils | Gas only | Common | Yes |
| Faulty cycling thermostat | Both | Moderate | Yes |
| Control board failure | Both | Rare | Usually not. |
How to Fix a Dryer That’s Not Getting Hot
Work through these in order. The first three fixes cover the majority of cases and cost nothing or next to nothing to address.
Fix 1: Check the Circuit Breaker (Electric Dryers)
What you need: Nothing.
Go to your breaker panel and find the breaker for your dryer. Electric dryers use a double-pole breaker, two switches tied together. If one side has tripped, it may look like it’s still in the ON position, just slightly off-center compared to the others.
Flip it fully to OFF, then back to ON. Go run a timed dry cycle and check for heat after a few minutes.
If the breaker trips again immediately or repeatedly, there’s an underlying electrical issue: a short in the heating element, a wiring fault, or an overloaded circuit. Stop and call an electrician or appliance tech before continuing.
A breaker that trips once and stays reset is usually due to a one-time power surge. One that keeps tripping is telling you something is wrong.
Fix 2: Clean the Lint Trap and Exhaust Vent
What you need: Vacuum with hose attachment, vent cleaning brush (optional but helpful)
A clogged exhaust vent is the single most preventable dryer problem there is. When airflow is restricted, heat builds up inside the drum, the thermal fuse blows as a safety measure, and you lose heat entirely. Even before it reaches that point, a partially blocked vent makes your dryer run hotter than it should and work much harder than it needs to.
- Pull out the lint trap and clean it thoroughly. If there’s a film of fabric softener residue on the screen (you’ll notice water beads on it rather than passing through), wash it with warm soapy water, rinse it, and let it dry completely before reinserting.
- Disconnect the dryer from the wall and pull it out. Detach the exhaust duct from the back.
- Vacuum out both ends of the duct, the dryer side and the wall side. A long, flexible vent brush makes this much easier.
- Go outside and check the exterior vent cap. Make sure the flap opens freely and isn’t blocked by lint buildup, debris, or a bird nest. It happens more than you’d think.
- Reconnect everything, push the dryer back, and run a cycle.
If the vent was significantly clogged and the dryer still doesn’t heat after cleaning, the thermal fuse has likely already blown. Move to Fix 3.
Fix 3: Test and Replace the Thermal Fuse
What you need: Multimeter, replacement thermal fuse (model-specific, usually $5–$15)
The thermal fuse is a small component, typically located on the exhaust duct inside the dryer or on the heating element housing. It’s a one-time-use safety device. Once it blows, it doesn’t reset, and the dryer won’t heat until it’s replaced.
Locating and removing the fuse:
- Unplug the dryer completely.
- Remove the back panel (most models) or the front panel, depending on your brand. A few screws and it should come off cleanly.
- Look for a small oval or oblong component mounted on the exhaust duct or heating housing, with two wires connected to it. That’s the thermal fuse.
- Disconnect the wires and remove the fuse.
Testing it:
Set your multimeter to continuity mode. Touch the probes to each terminal on the fuse. A good fuse gives a reading (or beeps). No continuity means it’s blown and needs to be replaced.
No multimeter? You can skip straight to replacing it. Thermal fuses are inexpensive, and if your dryer fits the blown-fuse pattern (no heat, drum still spins, vent was clogged), it’s almost certainly the issue.
Replacing it:
Match the replacement fuse exactly to your model number. Install the new fuse, reconnect the wires, reassemble the panel, and run a test cycle.
Replacing the thermal fuse without clearing the vent clog is pointless. The new fuse will blow again for the same reason. Always fix the root cause first.
Fix 4: Replace the Heating Element (Electric Dryers)
What you need: Multimeter, replacement heating element (model-specific, usually $20–$50)
If the thermal fuse tests fine and the vent is clear, the heating element itself may have burned out. Elements fail from age, overheating, or physical damage to the coil.
- With the dryer unplugged, access the heating element housing, usually at the back or bottom of the machine, depending on the brand.
- Disconnect the wires from the element terminals.
- Test with a multimeter for continuity. A working element gives a reading. No continuity means it’s failed.
- Remove the element assembly (typically held by one or two screws), install the replacement, reconnect the wires, and reassemble.
Look up a teardown video for your specific model before starting. The repair itself is simple, but access varies significantly between brands, and a 10-minute video will save you a lot of guesswork.
Fix 5: Check the Igniter and Gas Valve Coils (Gas Dryers)
What you need: Replacement igniter or coil kit (model-specific)
Gas dryers use an igniter to light the burner and gas valve coils (solenoids) to open the valve and let gas flow. Either one failing means no flame and no heat.
Igniter: Watch through the burner opening at the start of a cycle (with the dryer running but the panel removed carefully). You should see the igniter glow orange-red before the gas ignites. If it glows but the gas never lights, the coils are the problem. If it doesn’t glow at all, the igniter has failed and needs replacing. Igniters are fragile, so handle them carefully during removal. They snap easily.
Gas valve coils: If the igniter glows but nothing ignites, the coils aren’t opening the valve to let gas through. They’re sold as a kit and tend to fail together. Since they’re inexpensive and the labor to access them is the same regardless, replace the full kit rather than guessing which individual coil is bad.
Fix 6: Test the Cycling Thermostat
What you need: Multimeter, replacement thermostat
The cycling thermostat regulates the temperature inside the drum during a cycle, turning the heat on and off to maintain the right range. When it fails, it can cause the dryer to run without producing adequate heat or to cut the heat on and off erratically.
It’s located near the exhaust duct or blower housing. Disconnect it, test for continuity, and replace it if it fails. This is a less common cause, but worth checking if the fuse and heating element both test fine.
Fix 7: Control Board Issues
If you’ve worked through every fix above and the dryer still won’t heat, the control board may not be sending the signal to activate heating at all. Check for any error codes on the display first — your owner’s manual or the manufacturer’s website will have a code reference guide.
A full reset (unplugging the machine for two minutes) occasionally clears a stuck board. If the problem persists, this is professional territory. Control board replacements are expensive and require proper diagnosis to confirm that’s actually the issue before spending money on parts.
When to Call a Professional
If you ever feel lost at any point or if any of the fixes that we’ve mentioned above seem too difficult, you should always seek the help of a professional and not look to do it yourself.
That said, there are some situations where going DIY is completely unadvisable.
Gas dryer repairs that go beyond the igniter or coil replacement, meaning anything involving the gas valve, supply line, or connections, should be handled by a qualified technician. Gas is not the place to guess. If you smell gas at any point during your diagnosis, stop, ventilate the area, and call your gas company before doing anything else.
On the electric side, if the circuit breaker keeps tripping after being reset, there’s a wiring or short-circuit issue that needs a professional. Similarly, if your dryer is displaying error codes that point to the control board and the machine is more than 8 to 10 years old, the repair cost may not make financial sense. A technician can give you a straight answer on that.
A standard diagnostic call runs $80 to $150. If the repair estimate approaches half the cost of a new dryer, replacement is usually the smarter long-term call. For a professional assessment and honest pricing, you can always rely on trusted experts at MTV Appliance Repair
How to Prevent this Problem in the Future
Most dryer heat failures are preventable. A small amount of regular maintenance covers the majority of causes.
- Clean the lint trap before every single load. Not occasionally. Every load. A blocked lint trap restricts airflow immediately and puts pressure on every other component downstream.
- Clean the exhaust vent at least once a year. Twice if you run heavy loads frequently. This is the maintenance step most people skip until something breaks. A vent cleaning brush kit runs about $20 and takes 20 minutes.
- Check the exterior vent cap seasonally. Birds and small animals like the warmth and will nest in there. The flap should open freely with airflow and close fully when the dryer is off.
- Don’t overload the dryer. Large, dense loads restrict airflow inside the drum and make the machine work harder and run hotter. Split heavy loads into two cycles.
- Keep the area around and behind the dryer clear. The exhaust duct gets kinked or crushed more often than you’d think when things get pushed against the back of the machine.
Conclusion
A dryer that runs but produces no heat is almost always a solvable problem. In most cases, you’re dealing with a tripped breaker, a clogged vent, or a blown thermal fuse. All of which are inexpensive and fixable without professional help.
Work through the fixes in order. Check the obvious stuff first. The repair that solves most people’s problems is usually the one in the first three steps, not the last three.
And clean the vent. Seriously.
Frequently Asked Questions
The most common causes are a tripped circuit breaker (electric dryers), a blown thermal fuse, or a clogged exhaust vent. Start with those three before opening anything up.
Test it with a multimeter set to continuity mode. No continuity means it’s blown. If you don’t have a multimeter, they’re inexpensive enough that replacing it outright is a reasonable call if your symptoms match.
Yes, in two ways. A severely clogged vent causes the dryer to overheat, which blows the thermal fuse and cuts off heat permanently until the fuse is replaced. Even before that happens, restricted airflow reduces heating efficiency noticeably.
Start with the exhaust vent and thermal fuse, same as electric dryers. If those check out, move to the igniter and gas valve coils, which are the most common gas-specific failure points.
Usually, yes, if the machine is under 10 years old and the repair is a fuse, element, or igniter. Those parts are cheap. If you’re looking at a control board replacement on an older machine, run the numbers against a new dryer first.
At minimum, once a year. If you do a lot of laundry or have a long vent run, every six months is better. The lint trap should be cleared before every single load.